Stata | Slack Desktop | GitHub | GitHub Desktop | Git Bash | Git Large File Storage | Java and H2O | Overleaf and LaTeX
AAE 497A/597A students will need their own laptops set up with Stata before the first class meeting along with Github Desktop and Slack Desktop by week 2.
Stata
Purchase a 6-month copy of Stata BE for $48. Stata will send you a license, username, and password to download and install.
Slack Desktop
- Download either Slack for Windows or Slack for Mac.
- Your instructor will send an invitation to join a Slack Workspace to your
@arizona.eduemail address. - Accept the invitation and join the workspace by creating a username.
GitHub
- Create an account on GitHub using the
Sign up for
GitHub
form on the right side of the page. - Send your username to your instructor via a direct message (DM) on Slack.
- Once your instructor adds you to the course GitHub repository you will receive an email asking you to accept the invitation. Click on the link to accept.
- Check if this worked
- Go to https://github.com.
- Sign in if necessary.
- In the upper left corner click on the dropdown with your name.
- Confirm that the name of the course GitHub repository is present
GitHub Desktop
- Download Github Desktop and install it.
- Check if the installation is working:
- If you have not already done so, Slack your username to your instructor. Once you have received a GitHub invite to the class organization accept it and only then proceed.
- On the GitHub course webpage, click the green code button.

- From the dropdown menu select “Open with GitHub Desktop”.
- In the pop up window on GitHub Desktop change the local path to
C:\Users\your username\git\repo name\. - Click “Clone”
- From the buttons along the top of GitHub Desktop, click “Fetch origin”
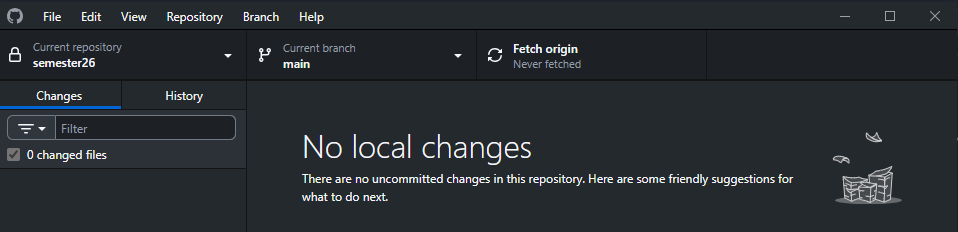
- Once you have fetched the repo from the internet, click on the button “Current branch” and create a new branch and name it using your last name.
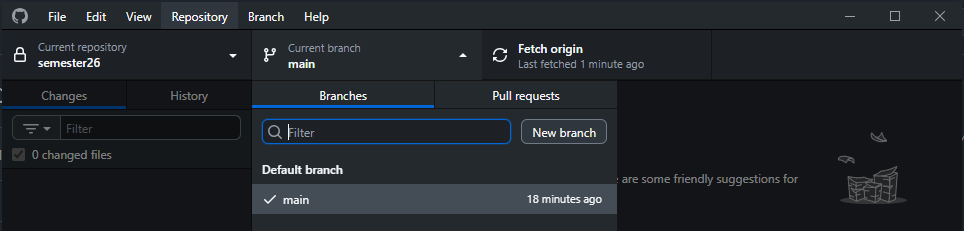
- Having created a new branch, you now need to publish it to the internet by click on the “Publish branch” button.

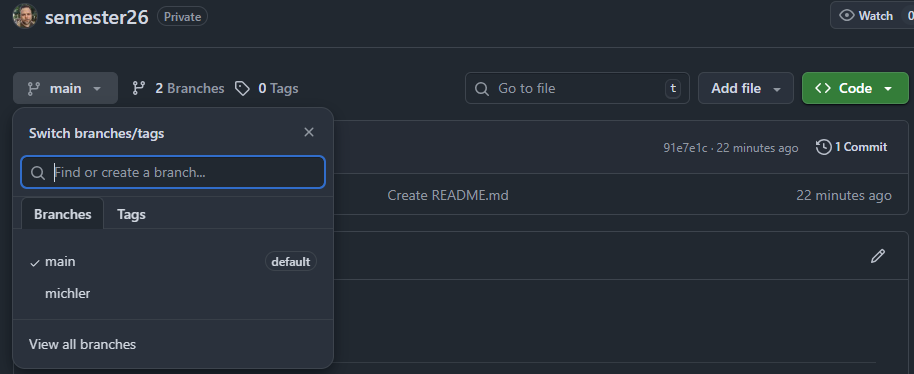
- Once the branch is published, return to the course Github page and click on the “main” button and verify that your branch is listed in the dropdown menu.
Git Bash
Git Bash is a command-line application that lets you run Git commands on your computer by typing them into a terminal window. While GitHub Desktop provides a visual interface for common Git tasks, some operations — like setting up Git Large File Storage (below) — require typing commands directly. Git Bash gives you a terminal on Windows that understands Git commands.
Mac users: You do not need to install Git Bash. Your Mac already has a built-in Terminal application (found in Applications → Utilities → Terminal) that works the same way. macOS also comes with Git pre-installed.
- Open Terminal, Command Prompt, or PowerShell.
- Type
git --versionand press Enter. - You should see output like
git version 2.39.5. If you see this, you are ready to proceed to Git Large File Storage.
Windows users:
- Go to https://git-scm.com/downloads/win.
- Click the download link for your system (64-bit is most common). Save the installer to your computer.
- Run the installer. Accept all the default settings — just click “Next” through each screen and then click “Install.”
- Once installed, open Git Bash by clicking the Windows Start menu and searching for “Git Bash.” Click on it. You should see a dark terminal window with a blinking cursor.
- Type the following command and press Enter:
git --version - You should see output like
git version 2.47.1.windows.1(the exact number may differ). If you see this, Git Bash is installed correctly. If you see an error, restart your computer and try again from step 4.
Git Large File Storage
GitHub has a file size limit of 100 MB. Some of the Stata datasets we use in this course are larger than that, so we need a way to handle them. Git Large File Storage (Git LFS) is an extension that stores large files (like .dta datasets) outside the main repository while still letting you push and pull them through GitHub Desktop as usual. You need to install Git LFS so that these large files download correctly when you clone or pull the course repository.
- Go to https://git-lfs.com and click the Download button.
- Run the installer. Accept all default settings.
- Open Git Bash (Windows) or Terminal (Mac).
- Type the following command and press Enter:
git lfs install - You should see the message
Git LFS initialized. This means Git LFS is set up on your computer. You only need to run this command once. - Now navigate to your course repository folder. In Git Bash, type:
cd /c/Users/your-username/git/repo-nameReplace
your-usernamewith your Windows username andrepo-namewith the name of the course repository folder. On Mac, the path will look likecd ~/git/repo-name. - Tell Git LFS to track
.dtafiles by typing:git lfs track "*.dta" - You should see the message
Tracking "*.dta". This creates a file called.gitattributesin your repository that tells Git which files to handle with LFS. - Add and commit the
.gitattributesfile:git add .gitattributes git commit -m "Track dta files with Git LFS" git push - Your instructor may have already completed steps 7–9 for the course repository. If you see a message that
.gitattributesalready exists or that*.dtais already tracked, that is fine — you are all set.
Java and H2O Setup (for Machine Learning)
Stata 19’s h2oml commands (random forest, gradient boosting) require two things to be installed on your computer: Java and the H2O machine learning library. Follow all the steps below.
Step A — Install Java
- Check if Java is already installed. Open Git Bash (Windows) or Terminal (Mac) and type:
java -version - If you see a version number (e.g.,
java version "25.0.3"oropenjdk version "21.0.4"), Java is already installed. Skip ahead to Step B. - If you see an error like
'java' is not recognizedorcommand not found, you need to install Java. Go to https://adoptium.net/. - The website should automatically detect your operating system. Click the large download button for the Latest LTS Release (currently Java 21). Save the installer to your computer and run it. Accept all the default settings.
- After installation, close and reopen Git Bash (or Terminal), then type
java -versionagain. You should now see a version number. If you still see an error, restart your computer and try again.
Step B — Download the H2O library
- Go to the H2O download page: https://h2o.ai/resources/download/.
- Under H2O Open Source Platform, click the Latest Stable Release button and then the Download H2O button. This will download a
.zipfile (the file name will look something likeh2o-3.46.0.10.zip). Save it somewhere easy to find, like your Downloads folder. - Unzip the file. On Windows, right-click the
.zipfile and select “Extract All…” On Mac, double-click the.zipfile. - Open the unzipped folder. Inside, you will see a file named
h2o.jar. This is the only file you need from this folder.
Step C — Place h2o.jar where Stata can find it
- Open Stata. In the Command window, type:
sysdir - Stata will display a list of directory paths. Look for the one labeled PLUS. It will look something like:
- Windows:
C:\Users\yourusername\ado\plus\or justC:\ado\plus\. - Mac:
/Users/yourusername/ado/plus/
- Windows:
- Open that folder in File Explorer (Windows) or Finder (Mac). If the folder does not exist, create it.
- Inside the PLUS folder, create a new folder called
jar. The result should be:- Windows:
C:\ado\plus\jar\ - Mac:
/Users/yourusername/ado/plus/jar/
- Windows:
- Copy the
h2o.jarfile (from step 9) into thisjarfolder.
Step D — Test that everything works
- In Stata, type the following command in the Command window:
h2o init -
Wait for Stata to display a message confirming that the H2O cluster has started. You should see output that includes “H2O cluster up” or similar. If you see an error about
h2o.jar not found, go back to steps 10–14 and make sure theh2o.jarfile is in the correctjarfolder inside your PLUS directory. If you see a Firewall alert, click the boxes next to domain network and private networks and the click the Allow access button.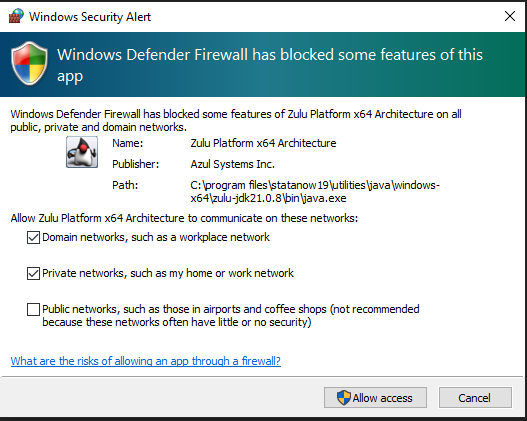
- Once the cluster has started, shut it down by typing:
h2o shutdown, force - If both commands run without errors, Java and H2O are configured correctly and you are ready for the machine learning assignments.
Overleaf and LaTeX
- Create an account on Overleaf using using the
Sign up for
   free
on the center of the page. - Send your username to your instructor via a direct message (DM) on Slack.
- Once your instructor adds you to the course Overleaf project you will receive an email asking you to accept the invitation. Click on the link to accept.
- Go to the course Overleaf project and create a new
.texfile by clicking on the “New File” icon on the far right just below the “Menu” button. Use your last name for the file name.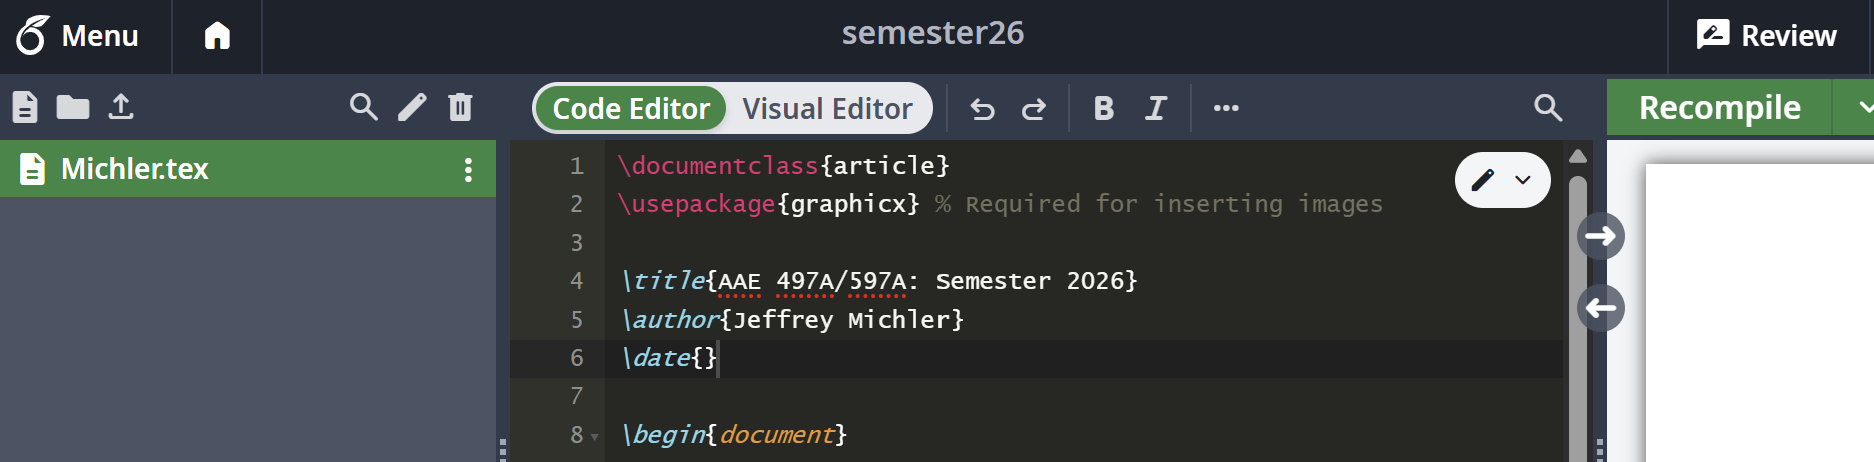
- Go to the file
michler.texand copy everything in that file. - Paste the content that you copied into the file with your name.